|
Winterizing
Your Sprinklers
|
| Tips
From Rain Bird to Help Keep Your Sprinklers Safe Until Next
Spring |
|
CAUTION!
WEAR PROPER EYE PROTECTION!
Extreme care must be taken when blowing out the system to avoid
excessive pressure which can damage valves or sprinkler pipe or
cause physical injury due to flying debris. Do not stand over
any irrigation components (pipes, sprinklers, and valves) during
air blow out. Air pressure must not exceed 50 pounds per square
inch (psi). |
| Without
proper preparation your sprinkler system can be damaged by freezing
temperatures. Here are some tips from Rain Bird on how to prepare
your irrigation system if you live in a region where it freezes. |
1.
Insulate your assets.
Shut
off the water supply to the irrigation system. The main shut off
valve for your irrigation system needs to be protected against
freezing. To prevent it from freezing make sure it is wrapped
with insulation (foam insulation tape and a plastic bag), or somehow
protected from freezing. If you do not have a main shut off valve,
consider it a preventative investment. Any above ground piping
needs to be insulated. Self-sticking foam-insulating tape or foam
insulating tubes commonly found at home supply stores, are fine. |
2.
Stay in control.
If
you have an automatic system then you will need to "shut
down" the controller (timer). Most controllers have a “rain-mode"
which simply shuts off the signals to the valves. The controller
continues to keep time, the programming information (start times,
valve run times, etc,) isn't lost, and the clock continues to
run. The only change is that the valves will not activate. If
your controller is responsible for activating a pump, as a precaution,
remove the wires that are connected to the MV and common. This
will prevent the possibility of the pump from being activated
which could cause overheat damage.
An
alternative to using the rain mode is simply to shut off the power
to the controller. If you do, you'll need to reprogram the time
and potentially all your other settings as well, in the spring. |
3.
Drain the pipes.
Now
you need to remove the water from the pipes and sprinklers so
that it won't freeze and break the pipe. There are several ways
to drain your pipes: the manual drain valve, the automatic drain
valve or the compressed air blow-out methods. However, since there
could be potential safety risks we recommend contacting your local
irrigation specialist. |
4.
Protect valves and backflow preventers.
Insulate
backflow preventers and valves if they are above ground. You can
also use insulation tape for this. Do not block the air vents
and drain outlets on backflow preventers.
Please
review the Rain Bird Homeowner's Guide to Winterization for detailed
instructions on how to prepare your irrigation system for the
Winter months.
Rain Bird Homeowner's Guide to Winterization |
| http://www.rainbird.com/pdf/diy/WinterizationGuide.pdf |
|
Winterizing
Your Irrigation System
Courtesy of Hunter |
|
|
| Every year, before the first freeze, the ritual of irrigation
"blow out" becomes the priority for all irrigation
systems that are in parts the country where the frost level
extends below the depth of the installed piping. |
Even
if you have drained some water out of the system, the remaining
water can freeze, expand and crack the PVC piping (rigid, white
pipe), usually from fitting to fitting. Polyethylene pipe (flexible,
black pipe) is used in many freezing climates. Although polyethylene
pipe is more flexible and can expand under pressure, water left
inside could freeze and rupture the pipe walls. Freezing water
in the backflow assembly will damage the internal components
and could possibly crack the brass body.
To
minimize the risk of freeze damage to your irrigation system,
you’ll need to "winterize" your irrigation system
Irrigation
systems in areas where "winterization" is mandatory
are installed using one of three types of water removal in mind:
manual drain, auto drain, or blowout. If you don’t know
your system type, it would be best to use the blowout method. |
Manual
Drain Method
Use when manual valves are located at the end and low points
of the irrigation piping. To drain these systems, simply shut
off the irrigation water supply (shut off will be located in
the basement and will be either a gate/globe valve, ball valve
or stop and waste valve - see drawings below) and open all the
manual drain valves. Once the water has drained out of the mainline,
open the boiler drain valve or the drain cap on the stop and
waste valve (whichever is used in your area) and drain all the
remaining water that is between the irrigation water shut off
valve and the backflow device. Open the test cocks on the backflow
device. If your sprinklers have check valves you’ll need
to pull up on the sprinklers to allow the water to drain out
the bottom of the sprinkler body. Depending on the location
of the drain valves, there could be some water left in the backflow,
the piping and the sprinklers. When all the water has drained
out, close all the manual drain valves. |
Automatic
Drain Method
Use when automatic drain valves are located at the end and low
points of the irrigation piping. These will automatically open
and drain water if the pressure in the piping is less than 10
PSI. To activate these, you shut off the irrigation water supply
(shut off will be located in the basement and will be either
a gate/globe valve, ball valve or stop and waste valve - see
drawings below) and activate a station to relieve the system
pressure. Once the water has drained out of the mainline, open
the boiler drain valve or the drain cap on the stop and waste
valve (whichever is used in your area) and drain the remaining
water that is between the irrigation water shut off valve and
the backflow device. Open the test cocks on the backflow device.
If your sprinklers have check valves you’ll need to pull
up on the sprinklers to allow the water to drain out the bottom
of the sprinkler body. Depending on the location of the drain
valves, there could be some water left in the backflow, the
piping and in the sprinklers.
In
some areas you might have a combination of the manual drain
system on the mainline (the pipe between the irrigation water
shut off valve and the valves) and auto drain system on the
lateral lines (the pipe between the valves and the sprinklers). |
"Blow
Out" Method
It is recommended that a qualified licensed contractor perform
this type of "Winterization" method, The blow out
method utilizes an air compressor with a Cubic Foot per Minute
(CFM) rating of 80-100 for any mainline of 2" or less.
These types of compressors can be rented at your local equipment
rental yard. The compressor is attached to the mainline via
a quick coupler, hose bib or other type connection, which is
located after the backflow device. Compressed air should not
be blown through any backflow device. To start the "blow
out", shut off the irrigation water supply and, with the
compressor valve
in
the closed position, attach the air compressor hose to the fitting.
Activate the station on the controller that is the zone or sprinklers
highest in elevation and the furthest from the compressor. Close
the backflow isolation valves. Then slowly open the valve on
the compressor; this should gradually introduce air into the
irrigation system. The air pressure should be constant at 50
PSI. If the sprinkler heads do not pop up and seal, increase
the air pressure until the heads do pop up and seal. The air
pressure should NEVER exceed 80 PSI.
Each
station/zone should be activated starting from the furthest
station/zone from the compressor slowly working your way to
the closest station/zone to the compressor. Each station/zone
should be activated until no water can be seen exiting the heads,
this should take approximately two minutes or more per station/zone.
It is better to use two or three short cycles per station/zone
than to have one long cycle. Once the station/zone is dry, you
should not continue to blow air through the pipe. Compressed
air moving through dry pipes can cause friction, which will
create heat and the heat could cause damage. |
Additional
Steps
Once the water has been removed from the irrigation system,
disconnect the air compressor and release any air pressure that
may be present. If your backflow device, the most common backflow
installed is called a Pressure Vacuum Breaker, has ball valves,
open and close the isolation valves on the backflow device numerous
times to ensure that any trapped water has escaped from the
upper areas. Leave the isolation valves open at a 45° angle
(approximately 1/2 open) and open the test cocks |
|
| Pressure
Vacuum Breaker |
Pressure
Vacuum Breaker
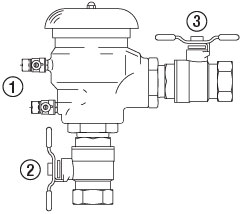
- PVB
Test Cocks
- Isolation
Ball Valve Inlet
- Isolation
Ball Valve Outlet
|
|
Interior
Point of Connection Freezing Climates
- Boiler
Valve
- Irrigation
Shut Off Valve
- Main
Water Shut Off Valve
- Water
Meter
|
|
| Types
of Valves |
|
|
|
|
Gate
Valve |
Ball
Valve |
Stop
& Waste Valve |
Boiler
Valve |
|
| Preparing
a hydraulic control system? Shut off the water supply
to the signal control tube(s) and drain the field tubing. |
| Outdoor
mounted controllers? Leave the power on and the dial
/ switch in the "Off" position. The heat from the
transformer will keep the enclosure warm enough to keep condensation
from forming inside the controller enclosure. The dial in the
"OFF" will keep the controller from activating the
solenoids in the field. |
Indoor
mounted controllers? You may either leave the power
on and the dial/switch in the "Off" position OR you
may remove the battery backup and unplug the transformer. |
| Rain
Sensors? There is not much to do to prepare the rain
sensor for the winter months. If your sensor is the type with
a cup or bowl that catches water, you might want to remove the
water and place a plastic bag over the sensor. This will keep
any water from accumulating and freezing in the cup or bowl
area. If your sensor is the type that uses wafers or discs,
you might want to remove the wafers and store them in the garage
for the winter months. This will keep damp wafers from freezing. |
The
Do NOTS of "BLOW~OUT" Winterization
Do not allow the air pressure to exceed 80 PSI for systems with
PVC piping and 50 PSI for systems with polyethylene piping.
Do not stand over component parts while the system is pressurized
with air.
Do not leave the air compressor unattended.
Do not blow the system out through a backflow or pump. First
blow out the system, then drain the backflow or pump.
Do not leave the manual drain valves open after the blow out. |

 Welcome to LawnSprinklers.ca


